

Imagine designing an email for an automotive company. Now, what if you could create an email that allows the potential customer to view the featured model in different colors without needing to visit the corresponding landing page to do that? (In fact, why don’t you check out a little something!)
That’s how far you can go with emails. No wonder interactive emails boost user response rate by 520%.
But you’re probably wondering how to nail such emails: What about responsiveness? Inbox support? Client compatibility? As it is, email can be hard to tame, let alone made to interact.
That’s what this blog post is set to address.
We’ll explore 7 creative ideas for interactive email templates, and tell you how to implement them successfully.
Let’s get going, from this side of a 5,000-client-strong team of email abbots.
7 Interactive Email Examples
1. Interactive Taps
Whether it’s quizzes, surveys, or product reviews, interactive taps are a great way to engage your subscribers.
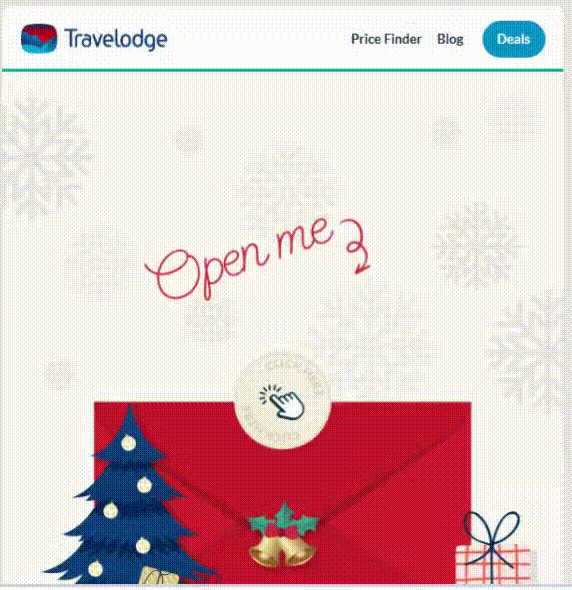
Take a look at the hero section of this email from Travelodge. On clicking the card, you can see a holiday message.
Check out the relevant code snippet for the interactivity below.
<tbody>
    <tr>
        <td class="zohofix">

            <!--[if gte mso 9]>
                <span style="display:none; mso-hide:all;">
            <![endif]-->
            <input
            id="dropdown_4_checkbox"
            name="hiw_gif"
            style="display:none; mso-hide:all;"
            type="radio"
            value="on"
            />

            <input
            checked
            id="dropdown_gif"
            name="hiw_gif"
            style="display:none; mso-hide:all;"
            type="radio"
            value="on"
            />

            <div class="frame wi-100p" style="display:none; mso-hide:all;">
                <label for="dropdown_4_checkbox" style="cursor:pointer; mso-hide:all;">
                    <img
                    alt=""                        src="https://em-img-02.moengage.com/travelodgemoengage/20241223101834654506Z01M11img-01.jpg"
                    style="width:600px; vertical-align:top; mso-hide:all;"                          width="600"
             />
                </label>
            </div>

            <!--[if gte mso 9]>
                </span>
            <![endif]-->

            <div class="animation wi-100p">
                <img
                 alt="" src="https://em-img-02.moengage.com/travelodgemoengage/20241223101834733216DRBN7Canimation-02.gif"
                 style="vertical-align:top;"
                 />
            </div>
        </td>
    </tr>
</tbody>
2. Interactive Hotspots
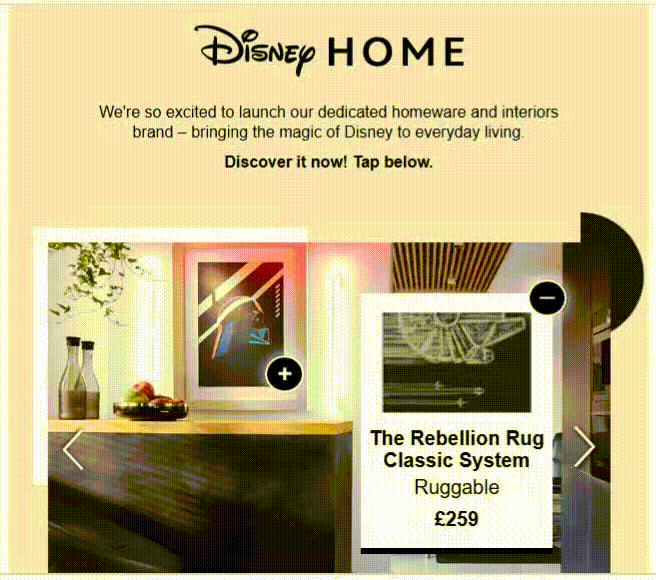
Even better than static buttons, hotspots are unmissable thanks to their distinctive “throb” which sets them apart. And that’s one of the reasons why they’re almost always placed in the hero section of an email. The hotspot’s a self-serving CTA, invariably fetching a couple or more clicks.
Catch Disney’s stunning carousel-cum-hotpsot email.
Below is the equivalent code snippet for Disney’s email.
<input type="checkbox" name="cbox" id="cbox" style="display: none; max-height: 0; visibility: hidden;" checked />
                      <div class="interactive" style="display: none; max-height: 0; overflow: hidden;">
                        <div id="carousel">
                          <input type="radio" id="arrow_1" name="controls">
                          <input type="radio" id="arrow_2" name="controls">
                          <input type="radio" id="arrow_3" name="controls">
                          <input type="radio" id="arrow_4" name="controls">
                          <input type="radio" id="thumb1" name="controls">
                          <input type="radio" id="thumb2" name="controls">
                          <input type="radio" id="thumb3" name="controls">
                          <input type="radio" id="thumb4" name="controls">
                          <div class="thumbs">
                            <label for="thumb1" class="thumb1 thumbnail"></label>
                            <label for="thumb2" class="thumb2 thumbnail"></label>
                            <label for="thumb3" class="thumb3 thumbnail"></label>
                            <label for="thumb4" class="thumb4 thumbnail"></label>
                          </div>
                          <div class="frames">
                            <div class="frame">
                              <div class="carImg"><img src="https://massmail.disneyinternational.com/integrated/uk/2022/201854/images/car-img1.jpg" alt=""></div>
                              <label for="hotSpot1">
                                <div class="hotSpot1 plus"><img src="https://massmail.disneyinternational.com/integrated/uk/2022/201854/images/plus-red.png" alt=""></div>
                              </label>
                              <label for="hotSpot2">
                                <div class="hotSpot2 plus"><img src="https://massmail.disneyinternational.com/integrated/uk/2022/201854/images/plus-red.png" alt=""></div>
                              </label>
                              <input type="checkbox" name="cbox" id="cbox" style="display: none; max-height: 0; visibility: hidden;" checked />
                              <div class="interactive" style="display: none; max-height: 0; overflow: hidden;">
                                <div class="popUp1 popUp">
                                  <label for="close"><img src="https://massmail.disneyinternational.com/integrated/uk/2022/201854/images/minus-red.png"></label>
                                  <div class="popUpimg"><a href="https://click.mail.disneyinternational.com/?qs=911cdf1e27849eae5b9c7e4b72b25735956745679f712249e4378087fc3b0c868ee8a948b25e9c63b0a1490a9eb880dd26400d631ec44d04" target="_blank"><img src="https://massmail.disneyinternational.com/integrated/uk/2022/201854/images/prod1.jpg"></a></div>
                                  <div class="title">Mickey Mouse (Mickey Chain) Canvas Print</div>
                                  <div class="brand">Pyramid</div>
                                  <div class="title">£59.99</div>
                                </div>
                                <div class="popUp2 popUp">
                                  <label for="close"><img src="https://massmail.disneyinternational.com/integrated/uk/2022/201854/images/minus-red.png"></label>
                                  <div class="popUpimg"><a href="https://click.mail.disneyinternational.com/?qs=911cdf1e27849eae6dea6405072fb37fcf46fd1fe42776a3895ad63a1a2e0b22695c8131a1edfd45a60d0175a636219686fd7f19955c1d3f" target="_blank"><img src="https://massmail.disneyinternational.com/integrated/uk/2022/201854/images/prod2.jpg"></a></div>
                                  <div class="title">Mickey Doodles Black and Ivory Rug</div>
                                  <div class="brand">Ruggable</div>
                                  <div class="title">£259</div>
                                </div>
                              </div>
                            </div>
3. Image Carousels
The point of a carousel is to enable users to view multiple images within just one viewport. Instead of creating a long email to show multiple images, you could code an interactive carousel. In the previous example, the carousel had been hinted at. Here’s a popular interactive email example from Comcast.

Take a look at the relevant code snippet below.
<!--[if !mso]><!-- -->
                <!--// SLIDER \\-->
                <div id="slide_cont" style="display:none; max-height:0; overflow:hidden;" class="width414">
                    <form id="formElem"><input id="rad_01" name="rad" type="radio" style="display:none"><input id="rad_02" name="rad" type="radio" style="display:none"><input id="rad_03" name="rad" type="radio" style="display:none"><input id="rad_04" name="rad" type="radio" style="display:none"><input id="rad_05" name="rad" type="radio" style="display:none"><input id="rad_06" name="rad" type="radio" style="display:none">
                        <div class="controlsSlide1">
                            <label id="hs_01" class="leftArrowDisabled" for="rad_01"><div></div></label>
                            <label id="hs_02" class="rightArrow" for="rad_02"><div></div></label>
                            <div class="geckoControls">
                                <a id="hs_g01" href="#rad_01" class="leftArrow"><div></div></a>
                                <a id="hs_g02" href="#rad_02" class="rightArrow"><div></div></a>
                            </div>
                        </div>
                        <div class="controlsSlide2">
                            <label id="hs_01" class="leftArrow" for="rad_01"><div></div></label>
                            <label id="hs_03" class="rightArrow" for="rad_03"><div></div></label>
                            <div class="geckoControls">
                                <a id="hs_g03" href="#rad_01" class="leftArrow"><div></div></a>
                                <a id="hs_g04" href="#rad_03" class="rightArrow"><div></div></a>
                            </div>
                        </div>
                        <div class="controlsSlide3">
                            <label id="hs_02" class="leftArrow" for="rad_02"><div></div></label>
                            <label id="hs_04" class="rightArrow" for="rad_04"><div></div></label>
                            <div class="geckoControls">
                                <a id="hs_g05" href="#rad_02" class="leftArrow"><div></div></a>
                                <a id="hs_g06" href="#rad_04" class="rightArrow"><div></div></a>
                            </div>
                        </div>
                        <div class="controlsSlide4">
                            <label id="hs_03" class="leftArrow" for="rad_03"><div></div></label>
                            <label id="hs_05" class="rightArrow" for="rad_05"><div></div></label>
                            <div class="geckoControls">
                                <a id="hs_g07" href="#rad_03" class="leftArrow"><div></div></a>
                                <a id="hs_g08" href="#rad_05" class="rightArrow"><div></div></a>
                            </div>
                        </div>
                        <div class="controlsSlide5">
                            <label id="hs_04" class="leftArrow" for="rad_04"><div></div></label>
                            <label id="hs_06" class="rightArrow" for="rad_06"><div></div></label>
                            <div class="geckoControls">
                                <a id="hs_g09" href="#rad_04" class="leftArrow"><div></div></a>
                                <a id="hs_g10" href="#rad_06" class="rightArrow"><div></div></a>
                            </div>
                        </div>
                        <div class="controlsSlide6">
                            <label id="hs_05" class="leftArrow" for="rad_05"><div></div></label>
                            <label id="hs_06" class="rightArrowDisabled" for="rad_06"><div></div></label>
                            <div class="geckoControls">
                                <a id="hs_g11" href="#rad_05" class="leftArrow"><div></div></a>
                                <a id="hs_g12" href="#rad_06" class="rightArrow"><div></div></a>
                            </div>
                        </div>
                        <div id="innerViewport">
                            <div id="inner_box">
                                <div id="slide_00">
                                    <div class="content">

									 <!--// actual action \\-->
                                    </div>
                                </div>
                                <div id="slide_01">
                                    <div class="content">
                                        <div class="contentImg" style="font-size:0;">
                                            <a href="https://emails.xfinity.com/pub/cc?_ri_=X0Gzc2X%3DYQpglLjHJlYQGrG6jKNSbbAOkWTFurwL8I3SmSlq9zcuakcDFUbccI6PUzaipOWMmIlRVXtpKX%3DUSYDYBDY&_ei_=Eq2tf9zs59idfPO1Sc_9BbnqG1KhQFKcd10kF-Co8H5OLCmRNVth5KXWBTgCL90eBZYbvYbvrgrtlXDAJ34Cnk7iP6srV87N-Y4zRpXB2ytQmtsfblJobP58e0." style="border:0; display:block;">
                                                <img src="https://static.cdn.responsys.net/i5/responsysimages/comcast/contentlibrary/2019_customer_mktg_q2/20190428_adhoc_cm_got_for_the_throne/20190428_Adhoc_CM_GoT_For_The_Throne.images/img1-dany-m.jpg" style="width:100%; vertical-align:top;">
                                            </a>
                                        </div>
                                      </div>
                                </div>
                                <div id="slide_02">
                                    <div class="content">
                                        <div class="contentImg" style="font-size:0;">
                                            <a href="https://emails.xfinity.com/pub/cc?_ri_=X0Gzc2X%3DYQpglLjHJlYQGrG6jKNSbbAOkWTFurwL8I3SmSlq9zcuakcDFUbccI6PUzaipOWMmIlRVXtpKX%3DUSYDYBDY&_ei_=Eq2tf9zs59idfPO1Sc_9BbnqG1KhQFKcd10kF-Co8H5OLCmRNVth5KXWBTgCL90eBZYbvYbvrgrtlXDAJ34Cnk7iP6srV87N-Y4zRpXB2ytQmtsfblJobP58e0." style="border:0; display:block;">
                                                <img src="https://static.cdn.responsys.net/i5/responsysimages/comcast/contentlibrary/2019_customer_mktg_q2/20190428_adhoc_cm_got_for_the_throne/20190428_Adhoc_CM_GoT_For_The_Throne.images/img2-jon-m.jpg" style="width:100%; vertical-align:top;">
                                            </a>
                                        </div>

                                    </div>
                                </div>
                                <div id="slide_03">
                                    <div class="content">
                                        <div class="contentImg" style="font-size:0;">
                                            <a href="https://emails.xfinity.com/pub/cc?_ri_=X0Gzc2X%3DYQpglLjHJlYQGrG6jKNSbbAOkWTFurwL8I3SmSlq9zcuakcDFUbccI6PUzaipOWMmIlRVXtpKX%3DUSYDYBDY&_ei_=Eq2tf9zs59idfPO1Sc_9BbnqG1KhQFKcd10kF-Co8H5OLCmRNVth5KXWBTgCL90eBZYbvYbvrgrtlXDAJ34Cnk7iP6srV87N-Y4zRpXB2ytQmtsfblJobP58e0." style="border:0; display:block;">
                                                <img src="https://static.cdn.responsys.net/i5/responsysimages/comcast/contentlibrary/2019_customer_mktg_q2/20190428_adhoc_cm_got_for_the_throne/20190428_Adhoc_CM_GoT_For_The_Throne.images/img3-nk-m.jpg" style="width:100%; vertical-align:top;">
                                            </a>
                                        </div>

                                    </div>
                                </div>
4. Accordions/Dropdowns
Yet another creative idea for interactive email templates would be accordions or dropdowns. The benefit of accordions is that you can include a lot of content in your email without cluttering up the entire space, leaving viewers overwhelmed.
With the help of an accordion, your subscribers can expand the section they want to read at a given time. (Note that it’s not the same as hotspots, except functionally; unlike hotspots, where content acts as a snippet, accordions favor long-form content.) Consider the following email from BBC.
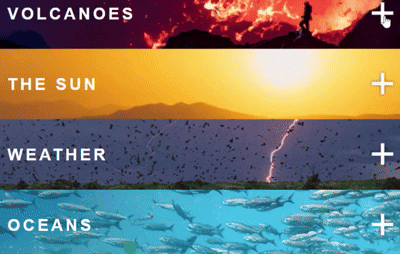
And here’s the code for the “Weather” section of the above email.
type="radio" name="opens" />
      <input id="open3" style="display: none!important; max-height: 0; visibility: hidden;"
<div class="content3">
                                        <table style="width: 100%; background-color: #000;" border="0" cellspacing="0"
                                        cellpadding="0" align="center">
                                          <tr>
                                            <td align="center">
                                              <img src="https://image.e.bbcmail.co.uk/lib/fe9013727761077872/m/45/weather-img.png"
                                              style="width: 100%; display: block;" alt="Weather" class="nomob">
                                              <img class="show" src="https://image.e.bbcmail.co.uk/lib/fe9013727761077872/m/45/weather-img-mob.png"
                                              width="0" height="0" alt="Weather" style="display:none;">
                                            </td>
                                          </tr>
<div class="weather">
                                      <label for="open3" class="open">
                                        <div style="width:100%; background: url('https://image.e.bbcmail.co.uk/lib/fe9013727761077872/m/45/weatherpp.png') center; height: 100px;">
5. Surveys & Polls
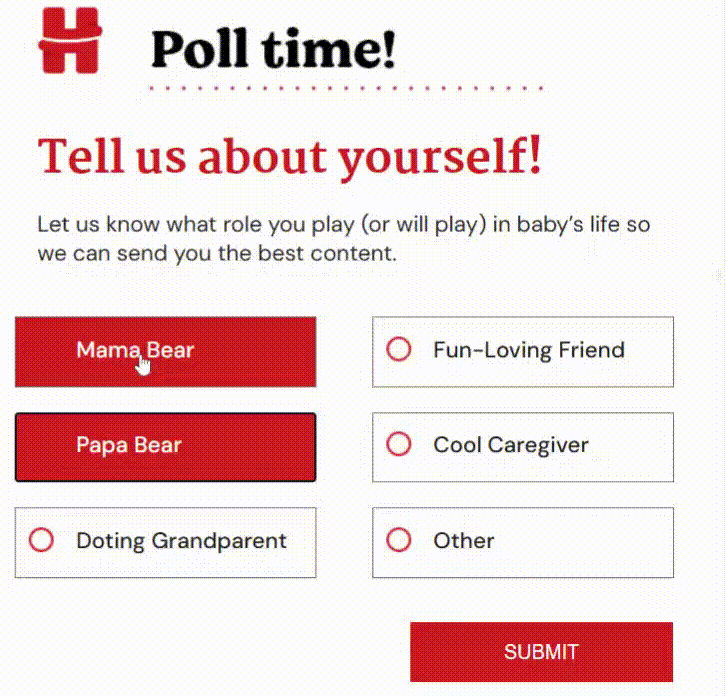
Creating interactive emails for entertainment is one thing; but if you could also use interactivity to collect engagement data, it’s a home run. This is where surveys and polls come in handy. You can quiz subscribers on their preferences, ask for feedback, and gather valuable opinions on your products or services. Below is a brilliant interactive email from Huggies.
6. Gamification
Gamification has to be one of the most popular forms of email interactivity. Dymtro Kudrenko, founder of Stripo, explains, “Gamification is the application of game-like components to non-game activities to enhance engagement with a product or service. It does not simply entail playing games. In email marketing, this approach entertains customers, motivates them to participate, and encourages ongoing interaction.”
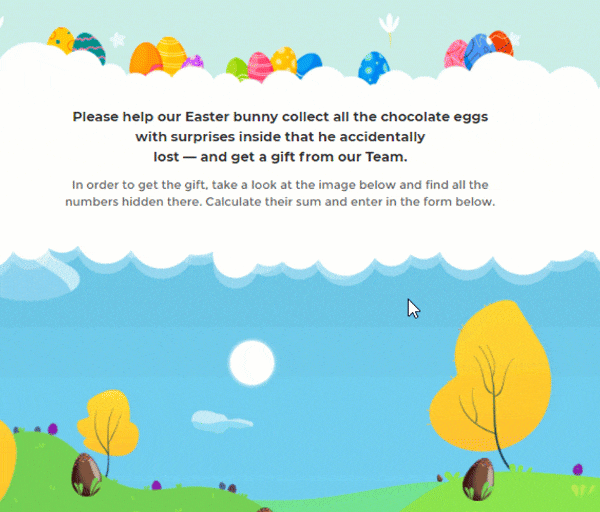
Take a glance at this Easter game created by Stripo. According to Stripo, gamification doubled their sales figure.
7. Hover Effect
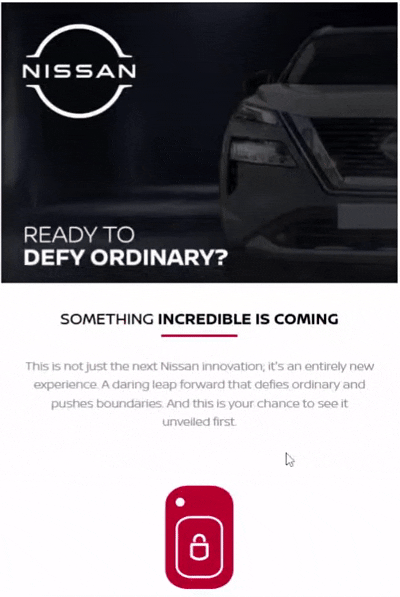
The hover effect, while basic, can be used to great effect if you can be creative with it. In contrast to a click, the hover effect lets you slide your mouse over a specific object in order to reveal something. It can be additional info, a CTA button in a different color, or even switching a headlight on, as the following email from Nissan does. Intriguing, and memorable!
Below is a code snippet for creating a hover effect in email.
<!DOCTYPE html>
<html lang="en">
<head>
    <meta charset="UTF-8">
    <meta name="viewport" content="width=device-width, initial-scale=1.0">
    <style>
        /* This style will only apply to clients that support it */
        .hover-button {
            background-color: #007BFF; /* Initial button color */
            color: white; /* Text color */
            padding: 10px 20px; /* Padding for the button */
            text-decoration: none; /* Remove underline */
            border-radius: 5px; /* Rounded corners */
            display: inline-block; /* Make it a block element */
            transition: background-color 0.3s; /* Smooth transition */
        }
        /* Hover effect */
        .hover-button:hover {
            background-color: #0056b3; /* Change color on hover */
        }
    </style>
</head>
<body>
    <table role="presentation" width="100%" cellspacing="0" cellpadding="0">
        <tr>
            <td align="center">
                <a href="https://www.example.com" class="hover-button" style="background-color: #007BFF; color: white; padding: 10px 20px; text-decoration: none; border-radius: 5px; display: inline-block;">
                    Hover Over Me
                </a>
            </td>
        </tr>
    </table>
</body>
</html>
Creating Interactive Emails: Things to Note
Interactivity is based on the dynamics between states and events in programming. The “state” refers to the current position of a system at a given time, whereas “event” describes the change of the state of the system.
Speaking of interactivity, you need to consider a few things with respect to inbox support. For interactive emails to work, your subscriber’s email client must support the following at the least:
- :checked, display:none, <style>
- for: pseudo-class/appearance:none
Apart from Windows Outlook Apps, Gmail, and obscure email clients from different countries, all inboxes support interactivity. Lack of support necessitates the use of fallbacks.
How to Make Interactive Emails in Outlook
As it is, coding interactive emails is no cream puff. However, with clients such as Outlook, it’s puff-meets-huff!

Invariably, you need to add MSO conditional comments in your doc. Take Comcast’s email for example. The HTML doc features the use of MSO conditional statements, such as the following.
<!--[if gte mso 9]><xml>
<o:OfficeDocumentSettings>
<o:AllowPNG/>
<o:PixelsPerInch>96</o:PixelsPerInch>
</o:OfficeDocumentSettings>
</xml>
<style type="text/css">
a {text-decoration: none;}
</style>
<![endif]-->
</head>
The conditional block targets Microsoft Outlook only. The XML block defines settings for Office documents. The image is allowed to render in PNG format, and the document resolution is set to 90 pixels. (Unlike Mac and Outlook for online, which use Webkit to render emails, Outlook for Windows uses MS Word.)
Again, go back to our first interactive email example, Travelodge. The code snippet features mso-hide:all within a conditional comment. This property ensures that the content is hidden in Outlook, but visible in other email clients.
Consider the following code snippet from BBC’s email example.
<!--[if gte mso 9]>

                            <v:image xmlns:v="urn:schemas-microsoft-com:vml" fill="true" stroke="false" style=" border: 0;display: inline-block; width: 600pt; height: 845pt;"

                            src="https://image.e.bbcmail.co.uk/lib/fe9013727761077872/m/45/outlook-bgpp.png"

                            />

                            <v:rect xmlns:v="urn:schemas-microsoft-com:vml" fill="true" stroke="false" style=" border: 0;display: inline-block;position: absolute; width: 600pt; height:845pt;">

                              <v:fill opacity="0%" color="#ffffff" />

                              <v:textbox inset="0,0,0,0">

                              <![endif]-->
The snippet contains VML. “VML stands for Vector Markup Language. It is Microsoft’s version of SVG, but the language has been depreciated and is very rarely used (yay, email!). Microsoft does have the documentation for VML archived online, so you can still look up how to use it to create vectors in Outlook, where it is still supported,” states this blog article by Litmus.
The code enforces VML in order to render image, text, and other relevant styles in all Microsoft Office applications, including Outlook. Since Outlook has limited to zero support for HTML and CSS, developers fall back on VML to render emails.
To sum up then, creating interactive emails in Outlook can be a real head-scratcher. So, try to avoid complex structures and interactions. In almost all our listed examples, the HTML docs featured MSO conditional blocks to render images only, not the interactive elements themselves.
Simplicity, fallbacks, and testing are your best friends here.
Have an Idea? Let’s Eureka Together!
Feel free to send us your design file—PSD, Figma, Sketch, XD, AI, PDF, or Invision—and our developers will code life into your tin mail. Get in touch with our template production gang!